Guide to Getting Started
MailBeez gives you and your online business the tools to create personalized and fully automated email campaigns, right from your store’s existing administration interface.
MailBeez is designed for easy installation, configuration and rock-solid operation. It works with read-only access to your existing shopping cart's database tables and also maintains its own database tables for things like remembering which customer has already received a certain email.
Not yet installed? If you have not yet done so, please install the MailBeez System.
Use the built-in Guided Tours to get a quick feel for the MailBeez system. You will find all available tours in the first tab of the Mailbeez admin panel.
Once you've installed MailBeez, a new link is added to your admin panel, which you'll then use to access your MailBeez Dashboard. Click on the Mailbeez link to open the dashboard, and take a few moments to browse around.
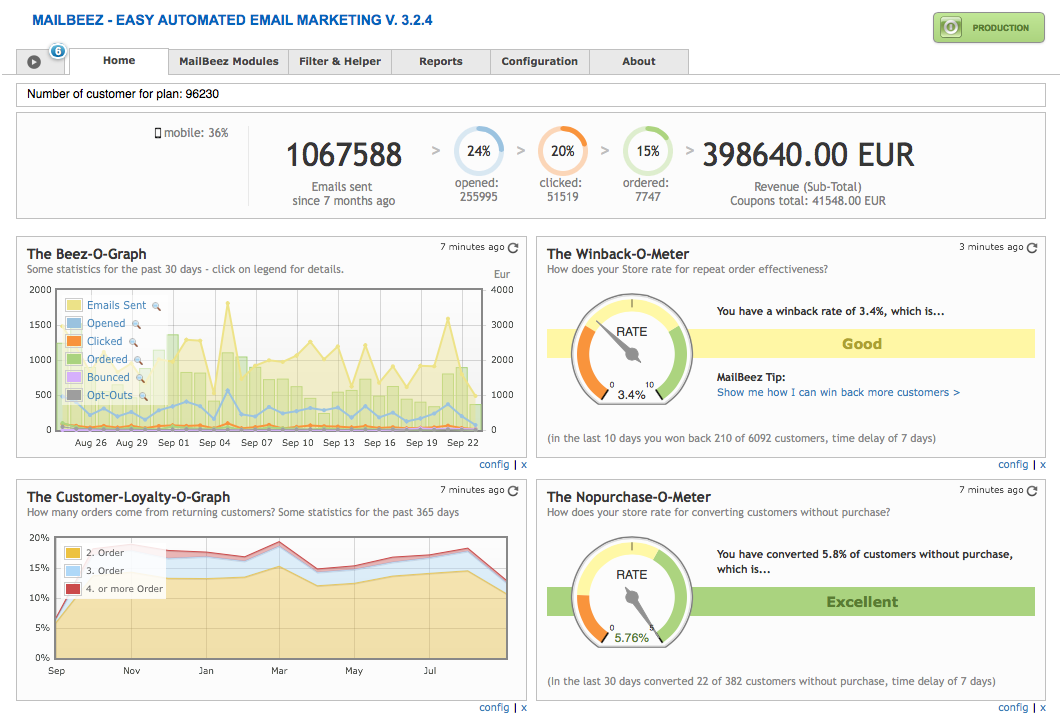
By default, MailBeez starts in Simulation Mode, which is indicated by an orange button marked “Simulation” in the upper right corner of the dashboard view. This button is visible throughout the MailBeez interface. The mode is also clearly visible in a widget section of the MailBeez main dashboard with a second larger button marked. Clicking either of these buttons changes the mode to either "Production" or “Simulation”. Not only does this change the mode you’re in, but it also changes the button color accordingly. So that, with a quick glance, you can see which mode you’re in:
When MailBeez is in Simulation Mode, you can freely play around with MailBeez settings and configurations to test your messaging and branding ideas. You can do this with full confidence that your customers will not receive any inadvertant emails as a result of these actions.
Across the top of the main interface, you will see a number of tabs which group common functionality and settings:
- Tour - Start interactive guided Tours
- Home - Get a quick overview of how MailBeez works for you
- MailBeez Modules - Find here all your MailBeez email modules. Go here to configure, test, and run these modules.
- Filter & Helper - Find here your MailBeez filter & helper modules. Go here to configure, test, and run these modules.
- Reports - Locate your MailBeez reports in this tab. Go here to activate & view your reports.
- Configuration - Adjsut configuration settings for the MailBeez framework, as well as activate extra configuration settings for premium modules.
- About - Find information about MailBeez, links to rate MailBeez, request a feature, and the domain information for premium modules.
The Beez-O-Graph is a powerful widget with an intuitive graph display that provides you with a visual report of your daily MailBeez Analytics data, such as number of emails sent, number of emails opened, number of email links clicked, number of products ordered as a result of your emails, and number of customer opt-outs. By default, it displays 30 days worth of data, but this number of days can be changed in the Beez-O-Graph configuration settings.
When MailBeez is first installed, there won’t be a graph displayed by this widget because there has been no data tracked and therefore nothing to display. Once you get your MailBeez email campaigns up and running, this widget will be populated with data in no time at all!
The Review-O-Meter is a powerful dashboard widget that lets you know how many customers are writing reviews of their purchases as a result of your Mailbeez Review Reminder email campaign. By default, it tracks & displays results for 30 days worth of data, but this number of days can be changed in the Review-O-Meter configuration settings.
Additionally, you can set your review goals based on your industry standards, product demand, and customer review patterns. The number you enter into this configuration setting is the percentage of reviews you hope to receive in relation to the number of Review Reminder emails sent. This setting has a direct impact on the behavior of the widget’s success measurement needle, so you’ll want to make this goal a reasonable one.
When MailBeez is first installed, the widget will show you that your review rate is in the “orange zone” because it doesn’t take into account any reviews that were written prior to installation. Once you start running your Review Reminder campaign and give it some time, you should see the needle start to rise so long as your review goal is reasonable. For example, if you set the percentage to 100, your widget will always be in the “orange zone” because this is a lofty and possibly unattainable goal. Start small and set your goals higher as the smaller ones are attained.
The Winback-O-Meter is a powerful dashboard widget that lets you know how many customers you’ve successfully caused to do repeat business with you as a result of your Mailbeez Winback email campaign. By default, it it tracks & displays results for 30 days worth of data, but this number of days can be changed in the Winback-O-Meter configuration settings.
Additionally, you can set your winback goals based on your industry standards, product demand, and customer repeat-business patterns. The number you enter into this configuration setting is the percentage of repeat business orders you hope to achieve in relation to the number of Winback emails sent. This setting has a direct impact on the behavior of the widget’s success measurement needle, so you’ll want to make this goal a reasonable one.
When MailBeez is first installed, the widget will show you that the rate of your repeat business is in the “orange zone”, because it doesn’t take into account any customers who have done repeat business prior to installation. Once you start running your Winback campaign and give it some time, you should see the needle start to rise so long as your winback goal is reasonable. For example, if you set the percentage to 100, your widget will always be in the “orange zone” because this is a lofty and possibly unattainable goal. Start small and set your goals higher as the smaller ones are attained.
The Nopurchase-O-Meter is a powerful dashboard widget that lets you know how many customers with no prior purchases were converted into purchasing customers as a result of your Mailbeez Nopurchase email campaign. By default, it tracks & displays results for 30 days worth of data, but this number of days can be changed in the Nopurchase-O-Meter configuration settings.
Additionally, you can set your conversion goals based on your product demand, and customer conversion patterns. The number you enter into this configuration setting is the percentage of conversions you hope to achieve in relation to the number of Nopurchase emails sent. This setting has a direct impact on the behavior of the widget’s success measurement needle, so you’ll want to make this goal a reasonable one.
When MailBeez is first installed, the widget will show you that your customer conversion rate is in the “orange zone”, because it doesn’t take into account any customer conversions that took place prior to installation. As with The Winback-O-Meter, once you start running your Nopurchase campaign and give it some time, you should see the needle start to rise so long as your conversion goal is reasonable.
The Loyalty-O-Graph is a powerful dashboard widget with an intuitive graph display that provides you with a visual report of how many orders come from returning customers. Because it tracks total repeat business without regard to the MailBeez Winback campaign modules, you can use the data this widget reports to compare against the data from the Winback widget to see how much of your repeat business is a result of your Winback email campaign. By default, it displays 365 days worth of data, but this number of days can be changed in the Loyalty-O-Graph configuration settings.
When MailBeez is first installed, this widget analyzes the database of orders for recurring orders and populates right away. Handy!
Note: You must have a valid Google Analytics account, and it must be activated and configured in MailBeez for this widget to function.
The Google-Analytics-O-Pie is a powerful widget that provides you with a visual report in the form of a pie chart, of all the MailBeez activity data that Google Analytics tracks for you, such as site visits resulting from MailBeez email campaigns, revenue earned with MailBeez, and a breakdown of that revenue by module so that you can see which modules are working hardest for you! By default, it tracks & displays results for 30 days worth of data, but this number of days can be changed in the Google-Analytics'O-Pie configuration settings.
When MailBeez is first installed, there won’t be a pie chart displayed by this widget because there has been no data tracked and therefore nothing to display. Once you get your MailBeez email campaigns up and running, and configure your built-in Google Analytics settings to begin tracking MailBeez activities, this widget will be populated with data in no time at all!
From the MailBeez admin panel:
- Click on the MailBeez Modules tab > Birthday Greetings
- Click on the “Install” button
- This will bring up the Birthday Greetings module configuration panel.
- Go to “Activate Module”, click “True”, and then click “Update” to turn the module on.
The remaining configuration settings are fine for testing purposes.
-
Preview the email templates to get an idea of what the default email templates look like: Placeholder content like ‘{$firstname}’ for example, show you where the dynamic data will be inserted in the final email. This placeholder content does not display in the email when the module is run. Instead, it is replaced with the information it represents (such as the customer’s first name, for example), as you will see in the next step when you send a test email.
-
Send a test email
When you click on the send button, you will get a popup screen in which you’ll be able to enter the email address where you want the test email to go to.
ZenCart: It is a good idea to send a test email to an email address which is configured to receive email in HTML format, and send a second test email to an email address which is configured to receive email in TXT only format. This way, you can see what your customers will see whether they are receiving mail in HTML or TXT format. This process ensures both your HTML and TXT format emails look sharp & professional.
The MailBeez email template system is designed to let you control everything about the design, layout, and content of your emails, so that you can customize them to reflect your brand and the personality of your store. Mailbeez emails are 100% template based, and therefore can be customized without any programming knowledge whatsoever. As long as you are comfortable with a little HTML editing, you will be able to make changes to Mailbeez templates or even create your own.
Whether you are using MailBeez free email templates or MailBeez premium email templates, the email template system is structured to use global templates that affect all emails, as well as sub-templates which are specific to each MailBeez module. Some of the customizations you make will be on a global scale whilst others are made on a per-module basis.
All Pro Subscriptions enhance your System with the visual template editor, so you can easliy adopt your templates from within the MailBeez system! And you don't have to worry about having updates overwriting your changes as all templates will be stored in your database.
No doubt you will want to replace the template email header with an email header of your own. This will be a global customization as you want it to affect every email MailBeez generates.
Using the free basic system? Follow these simple steps:
- copy/rename the default main template
/mailhive/common/templates/default_email_html.tplto
/mailhive/common/templates/email_html.tpl
NOTE: All templates that have a filename starting withdefault_will be overwritten during system updates! - Create a new image with a width of 600px
- Name the new image. For example “`mynewheader.png? ”
- Using your preferred FTP program, upload the new image to “
/mailhive/common/images/” - Edit the Common Main Template located
/mailhive/common/templates/email_html.tpl
as indicated below - Find the line of code which defines the email header image:
<img src=”{$catalog_server}mailhive/common/images/default_emailheader.gif” … > - Edit the code shown above to reflect the new image name to get this:
<img src=”{$catalog_server}mailhive/common/images/mynewheader.png” …> - clear the cache of compiled template files using the button in MailBeez > configuration > Template System
- your changes are not effective in preview and emails
Remember: Changes in files having a filename starting with
default_will be lost with the next update as these files are overwritten
All Pro Subscriptions enhance your System with the visual template editor, so you can easliy adopt your templates from within the MailBeez system! And you don't have to worry about having updates overwriting your changes as all templates will be stored in your database.
Using the Birthday Greeting module as an example, let’s say you want to change the ‘Happy Birthday’ graphic and it’s layout.
Using the free basic system? Follow these simple steps:
- copy/rename the module template
/mailhive/mailbeez/birthday/email/default_body_html.tplnach
/mailhive/mailbeez/birthday/email/body_html.tpl
NOTE: All templates that have a filename starting withdefault_will be overwritten during system updates! - Create a new image, sized 256px by 256px
- Name the new image. For example “
balloons.png” - Using your preferred FTP program, upload the new image to ”catalog/mailhive/mailbeez/birthday/images/”
- Edit the Birthday Greeting email template
/mailhive/mailbeez/birthday/email/body_html.tplas indicated below - Find the line of code which defines the Birthday Greeting image:
<img src=”{$catalog_server}mailhive/mailbeez/birthday/images/birthday\_cake.png” …> - Edit the code shown above to reflect the new image name and location within the layout to get this:
<img src=”{$catalog_server}mailhive/mailbeez/birthday/images/**balloons.png**” …> - clear the cache of compiled template files using the button in MailBeez > configuration > Template System
- your changes are not effective in preview and emails
Remember: Changes in files having a filename starting with
default_will be lost with the next update as these files are overwritten
When you’re ready to see more examples or make more customizations to your email templates, check out our detailed tutorials:
Edit your templates right from your shop admin with the MailBeez Template Manager. A simple drop-in Installation means you can begin editing template files from your admin in minutes! Visit the module now
All premium email module templates come packaged without the MailBeez Copyright Notice so you can truly brand the emails these modules generate. If you would like to have the additional footer containing the MailBeez Copyright Notice removed from the free email module templates, you may do so by either upgrading the free module to the premium version, or by purchasing the MailBeez Copyright Remover Certificate. Also having a valid Pro-Subscription will remove the copyright notice from any free module.
You can book one of the feature rich Pro subscriptions right from the MailBeez system! You can easily install and update with a couple of clicks!
The easiest way to browse for additional modules that might interest you is to use the Version Check Widget on the MailBeez Dashboard to bring up the AppStore.
Begin by clicking on the “Check for Update” button and the software will automatically check itself for updates & additional module opportunities. You will see the widget change to provide color-coded information: orange for updates and blue for newly released modules you may want to consider installing.
Notice also the color-coded indicators on the tabs which alert you to updates and new modules by category.
Clicking on any tab displaying blue indicators will result in being taken into that tab where you’ll see the Appstore displaying all of the available modules in that category which you have not yet installed.
From here, you can click on the modules that interest you to be taken right to the module’s documentation page where you can read more about it, download it if it’s a free module, or click the purchase link if it’s a premium module. Handy!
MailBeez is in the process of creating step-by-step configuration tutorials for all of our modules, both premium & free, so you can download with confidence! Check back often – the tutorials page is updated as tutorials become available. MailBeez Modules Configuration Tutorials
MailBeez can be run daily by processing of each MailBeez module manually – which might become quite time consuming. Therefore it is much better to set up a cronjob to run Mailbeez each day, allowing you to truly ‘set and forget’ Mailbeez once it is installed. If you don’t want to spend hours learning how to set up a Cronjob, then the “Run MailBeez Automatically” module is perhaps the ideal solution for most stores to automate MailBeez.
To get started, first download the module, follow the easy installation instructions and set “time between running MailBeez (hours)” to “12″. Now your MailBeez will be processed twice a day, catching the optimum amount of customers for each active module!
Once you have completed testing, email template customization, and a complete configuration of your installation, you will be ready to switch from Simulation Mode to Production Mode and begin sending your first email campaign! This can be done in the Configuration tab in the MailBeez interface.
Thanks to the integrated Update feature it is very easy to keep your MailBeez System and eventually installed Pro Subscriptions with a couple of clicks up to date. The free community modules need to be updated manually by uploading through FTP.
Found errors? Think you can improve this documentation?
edit this page